Showing posts with label japanese saw sharpening. Show all posts

Saturday, January 28, 2017

New shield

One of the few things I missed when moved to my new workshop was the little shield for saw sharpening. It just disappeared between the planes and the shavings. 

So today I made a new one and I like it even more than the previous one. 

It's made out of a piece of hacksaw blade grinded to a thin edge and polished in a diamond stone. 

A shot for a size idea


And the taper and central nick the shield has


This is how you hold it:


My small fingers are touching the back of the saw, it's a very gentle grip, I reckon you can see that from the pictures.


And that's a madonoko that finally is getting ready. Since I gave mine to Jason haven't had time to play with one. 

Thursday, March 24, 2016

Where the money is

You know, science is about truth searching, isn't it? Well, think again. Money is given to universities to advance a certain agenda, the agenda of those who have money or power (which are usually the same).

Saw tensioning is worth of study as any other subject, but since you make more money selling disposable circular saws to big companies, that's where the science is. Said in other words, you are not gonna get funded to study the tensioning of a ryoba so we need to divert some of the colloidal suspension money into it.

Usually the first step in a research project is to check out the literature and share it with your friends so you start talking the same language. This is what we are doing here.

Our first paper in this study is "Understaind Saw Tensioning" by G.S. Schajer appeared in 1984 in the journal Holz als Roh- und Werkstoff. Here's the link.

I just copy paste the interesting quotes to give you an idea of what the paper is about.

This paper describes the various techniques of circular and band saw tensioning, and explains how they work. It also discusses many of the significant contributions to the literature in this field.

Circular saw tensioninginduces stresses in the sawblade such that the periphery is pulled into tension. These stresses alter the saw vibration fiequencies, and when favorably dis- tributed, they can significantly improve sawblade stability.

The traditional way of tensioning both circular and band saws is by hammering their surfaces. The hammer blows in- dent the saw steel and squeeze it laterally in the plane of the plate. These highly localized deformations induce the tensioning stresses. Harmmer tensioning is very much an art, and great skill and experience is required to achieve good results. When done well, hammering can be as effective as more modern methods. However, hammer tensioning is usually not recommended for general use because the results can be very variable. Also, the hammer blows make the saw blade surface uneven and can initiate fatigue cracks.
 
A small induction generator heats the sawblade close to the collar to a temp rature in the range 30-80 C. This modest temperature does not cause any permanent changes, such as occur during heat tensioning. Thermal expansion of the heated central region of the saw induces tensile stresses in the unheated outer region. These tensioning stresses exist only while the central region of the saw is kept warm. When the induction generator is turned off; the saw returns to its original state. In practice, the induction generator is controlled so as to maintain a set temperature difference between the inner and outer regions of the sawblade.

Food for thought.

The pictures is from another paper and presents the analysis I plan to make for a ryoba with a shaped surface. These are the normal modes for a circular saw, the way it displaces out of plane. Any vibration of the blade can be decomposed into a sum of these modes, like a string in 1 dimension if you catch my drift.


 What you want to do in a saw is to dampen the low frequency modes so the vibrations are high frequency and low amplitude, thus your kerf is straight. Do you achieve this by carving the centre of the blade with the sen? by doing a surface hardening with a burnisher? I bet you can, I bet you do.

Saw tensioning is an obscure subject, but not because being intrinsically difficult or magical, but because the economic conditions of the world had made the subject not worth of research effort while at the same time making the people who knew this art redundant and obsolete. To change this means to work in a lateral way to usual university/research work, freed from corporate interest, based on friendship and love for knowledge. As it used to be, as it should be.

Stay tuned.
This paper describes the various techniques of circular and band saw tensioning, and explains how they work. It also discusses many of the significant contributions to the literature in this field. 

Friday, March 18, 2016

Why japanese teeth are better

Bad teeth are better than no teeth, but sweet ass teeth is what you look for in a smile.

Western saws cut, and ugly teeth do smile, but japanese are better and we know it. Why? The secret is as usual a fragile balance between two opposite forces, and japanese craftsmen know to walk on the tightrope.

Let's start with a western saw pattern, projected onto two dimensions for the sake of simplicity.


The gullet space is where the saw dust goes once you start cutting, so the more space there is, the more you can cut with each tooth.

Say we instead of using a triangular file to sharpen, as in western world, we use one file for each side of the tooth, as is done in developed places like Chile.


 That looks more like our mountains here. Which is better in the sense that gives you more space where to put the sawdust so you can cut more with each tooth. But, here starts the contradictory principle to play, as you make the teeth pointy they become also weaker. The strength of the material is proportional to the area (volume in 3D) of the teeth, so as you increase the angle they become weaker... something you don't want in your mouth, weak teeth.

Not clear? Well, let's solve the plane stress relation for a fixed material with different geometries and see if you get it. (Red is the deformed geometry, black the relaxed position)


I'm applying a force on the left facet of the teeth, always the same force, and checking the deformation of the teeth. As the teeth becomes more pointy, they also deform more in the tip. Eventually they can reach their breaking point and pluff. Cappicci?

So what you do? You can change the geometry of the teeth such that they are strong yet have plenty of room for the sawdust. How you do that?


Indeed, you create a third facet that increases the strength of the teeth since it supports it from the back, that's where the force of the wood on the teeth is going.

Like this:


Without the third top facet the tooth become weak and useless.

Now, since we have a strong tooth and plenty of space to put the sawdust, we can put more teeth per inch and remove the same amount of sawdust as the western pattern, only faster and easier.


This is maybe an exaggeration but you get the idea, as long as you have enough gullet space you can put more teeth and cut faster.

did you like that fem plot? Me too, I'm coding later a japanese teeth pattern and show you why it's better to cut chumasaru rake and what's the best angle for the top facet. And maybe in a few days we go 3D.

I will continue dwelling in saw sharpening for a while since it's been too long that I promised to make a write up and send a pdf of it to the guys who took the class in NL. Sorry for the delay but I was busy learning how to do this FEM analysis, amongst other things.


Thursday, October 22, 2015

Universal Dozuki

Long time with no teeth pictures isn't it?

I got myself a disposable dozuki from dictum to check the shape of the back and the teeth geometry. And more importantly, so my students don't break the teeth of my hand made saws.

The one I got is a 180mm. All the others I have (1 new, 2 buyee) are cross cut 240mm and they feel a bit large for most of the cross cut I make, to not mention for cutting dovetails in a normal 7/8'" piece.

Part of my diabolical plan with this dozuki is also to make replacement blades out of old ryobas I got. I'm thinking in particular in 2 thin ones that broke at the rip side.

Anyway, here it is. I keep on packing my stuff so no much workshop work or cutting pictures, I just let you know the geometry.


The teeth are cut like rip, ie 90 degrees to the plate with a third bevel that changes direction as the set does.


Fairly fat and slightly negative rake they should have no problem with hardwoods. As in tropical woods, not normal hard woods. Tried it in rosewood and cuts fine if a little rough on the cross cut. Didn't try dovetailing since had to make lunch.

And this is what I find most interesting:


A very fat and large top facet.

I didn't manage to catch on picture but there is a subtle blue at the very tip of the teeth on the sides. However the top facet doesn't seem to have it. My guess is that after a few months of use I will be able to sharpen with a normal file. That is, if I manage to find a one sided pack of files for then in Japan.

A few months ago I sent a mail to Gabe, Mark and Jason asking how we could turn a rip saw into a diagonal cutting one. Something like the madonoko but starting from a rip. Maybe this is the path albeit in the case of a rip saw the teeth increase in size along the length of the saw, and who knows how well this geometry works for larger pieces. What I want to say is that I haven't seen this in large saws, so there may be a reason for it.

Naja.

Me misses workshop and saw vice.

Tuesday, August 25, 2015

Open Source Forge

Heads up for my man Mark there in the north, he just sent me pictures of his forge in the making. I love the art...
 south elevation
-------------------------------------------------------------------------------------------------------

 east elevation
-------------------------------------------------------------------------------------------------------

 Foundation
-------------------------------------------------------------------------------------------------------

 south at top, 1/4 " = 1 ft. or shaku
-------------------------------------------------------------------------------------------------------

 roof structure
-------------------------------------------------------------------------------------------------------
​layout of tools, doors, and shoji; west room changeable except sen platform is more certain.
-------------------------------------------------------------------------------------------------------

Thanks Mark, this is truly a great gift to all of us. 


Wednesday, August 19, 2015

For Love or Money

"L'amour est a reinventer, on le sait." 
Rimbaud


The title is stolen from an essay of Michael Hardt that starts like this:
The expression “for love or money” is generally used to indicate the two extremes, which cover between them the entire spectrum. “I wouldn’t do that for love or money” means I wouldn’t do that in exchange for anything. It can be interesting, however, to read that or as marking not an opposition but a common function that love and money share, somewhat like the or in Spinoza’s famous phrase “deus sive natura,” which claims polemically that god and nature are two names for substance itself. I do not intend to propose that love and money are the same thing, but rather, that putting them in relation can reveal the power to create and maintain social bonds that is proper to money and can (and perhaps should) be also the vocation of love. Posing love in relation to the power of money can help us construct a properly political concept of love.
We lack such a political concept of love, in my view, and our contemporary political vocabulary suffers from its absence. A political concept of love would, at the minimum, reorient our political discourses and practices in two important ways. First, it would challenge conventional conceptions that separate the logic of political interests from our affective lives and opposes political reason to the passions. A political concept of love would have to deploy at once reason and passion. Second, love is a motor of both transformation and duration or continuity. We lose ourselves in love and open the possibility of a new world, but at the same time love constitutes powerful bonds that last.
I was reading a post about crafts and society and this phrase struck as totally, completely wrong. "At this point in time we are faced with the fact that we may only have a one method to make change and it's through where we put our money." I think it was the god young Oscar Wilde who said you cannot fix poverty with the same means that create it. If it wasn't he, tan pis.

It doesn't really matter where you put your money, it eventually spills to BP and BP spills it back at you.

(I do love how ideology at its purest appears here, by recourse to the facts.  "Sie wissen das nicht, aber sie tun es," they know it not, but they they do it, said my german friend. )

Then I was reading yet again a very poignant text on the extinction of crafts in Japan: http://www.tokyofoundation.org/en/articles/2010/handicraft-extinction-1

I like to re-read things I like, since I always find mistakes on the text that the previous time I didn't see because I was too thrilled by the content. The mistaken sentence was this: "There were always cold, hard economic reasons for the extinction of a trade." Then he goes to argue what happened with natural resources and labour, and finish with: "But the most basic reason was that demand for the hand-made items produced by these cottage industries had declined sharply."

It's true that there are cold, hard, very real economic reasons for the extinction of manual work around the globe. But those cold, hard and phallic economic reasons are put forward with a big shovel of politics and violence. Political violence as in Greece, or pure violence as in Chile 50 years ago. Oh wait, didn't they throw something like a nuclear bomb in Japan before transforming its means of production from hand made to machine made? I may be watching too much anime and started to see violence in every economic transformation I find —my bad.

And now for the Gonzalez turn: saw sharpening was always a labour of love. If you don't believe me, sit there and learn it. Without love you end up nowhere. Saw sharpening as a technique is not coherent with global capitalism because is a work of love. And if you want to keep saw sharpening alive you need to simply restructure the whole of the global economy. Besides that, you would be stopping more global warming — but that's secondary, what's important is that we have sharp saws, and that our children have sharp saws, and the children of those children have them too. If they also have an environment and wood to cut, it wouldn't hurt.

Somewhere further along the article Hardt says that love should be able to organise social relationships. Ya know, instead of working for wages working for love. Instead of paying teachers to develop a curriculum in a university and teach it, make it ourselves and teach it ourselves, not for money but for love. You see where I'm going no?

Sounds crazy, I know, but the only crazy ones are the ones thinking that a steady growth and GPD indices will solve all our problems. They have been not only proven wrong by history and the environment — they didn't solve any problem and destroyed the biological support for pretty much life on earth in the attempt, in just a few years —, they have also showed themselves stupid, mad and selfish.

Love is to be reinvented, said Rimbaud. And one knows it.

A gut feeling that is, but a truth nevertheless.

Tuesday, July 28, 2015

Break one tooth and you are an idiot

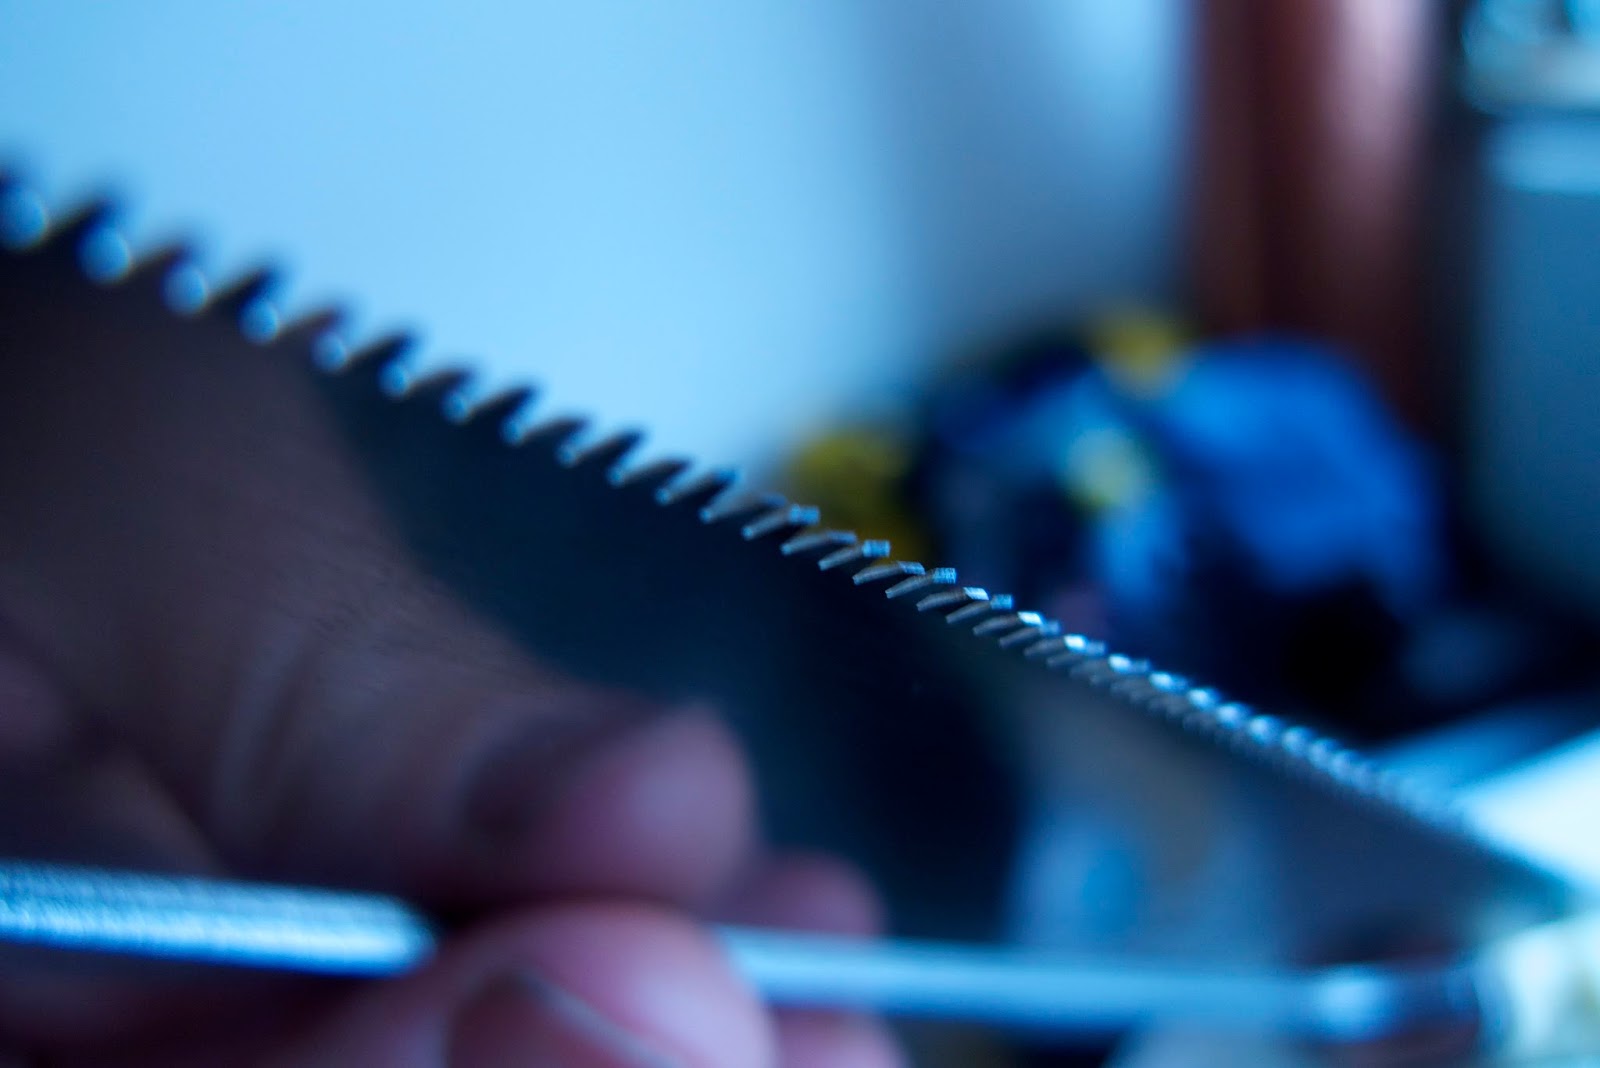
Break 20 and you are creating the Gonzalez™Universal Random Matrix tooth pattern. Created by your humble blogger (did you know that in germany blogger is a clothing style too?) myself.

The Gonzalez™Universal Random Matrix saw consists of gullets arranged in the same pattern as the first 12 eigenvalues of a random matrix. It's like the Fibonacci series but cooler and made precisely to cut well. It also solves the basic levels of an hydrogen atom when the chromodynamics equations are taken into account.


It also presents a carefully filed curve in the top part of the saw that both dissipates heat while cutting and compensates the movement of the hand at the end of a stroke

Let's see it closer


The depth of the gullets follow a catenary function to improve sawability


Here is the dissipation zone


It does cut like it is expected from a Gonzalez™Universal Random Matrix saw, as soon as Julia brings her Ipat i shot a video of it.

All this thanks to 1 single sided file I found in my box. Man they are sweet for dozuki. I used to think dozuki were difficult to file. I was simply using the wrong tool.

On the other news I'm moving to Valpo for a few weeks, second carpentry course will have sushi it seems. I'm building the structure from the previous exercise and taking Keiran with me to continue his apprenticeship


I also made a dai sunday, but chilean roble doesn't have "rays", is the one on top without sub-blade. The endgrain


 We also thought about acacia, but no rays either, extremely hard though. (Also, the left side is planed, the cuts directly from the dosuki I sharpened today.)


 American oak does but I don't like it

 Japanese white oak
 more

 some other wood, more metallic, for a blue paper steel blade


 And I've been making some handles of old smelly oregon pine (or something like that)

EDIT:

In case you ask... I bought the dozuki originally form fine-tools, before moving to Graz. I tried to make a bed in douglas fir with it, construction market lumber. Then it broke. The saw can be found here: Shirai Sangyo Dozuki however, after seeing more carefully how I broke the teeth, like 90% of them broke on the same side, which indicates to me that the set was not properly made in this saw.

If you want to get one, bring me a dozuki, a single sided file, and a few beers. Let's say 30 litres. Or 20 litres and 5 kilos of meat that you need to bbw while I file.

Now, if you don't think on visiting chile in the near future, you always can get one from nagakatsu, but he doesn't have the random matrix pattern. Take a look: http://www.mitsurouwax.com/nagakatsu/doutsuki1.html

Another option would be to make a small workshop in Germany during October, not in Munich though, too many drunkards and too close to the Reich in October. In Celle instead. Saw vice making, saw sharpening and madonoko making. I got 34 hits from Germany last week so I guess somebody over there is reading this.  Wir konnen ein kleines bischen Deutsch, and I guess Julia would be trilled to work as a translator. Shall I put an ad somewhere?

Saturday, July 25, 2015

Graduation day

The day started like this:


Sharpening saws + uradashi was the menu. Leftmost saw was the victim


Grabbed a branch and handled my file


Any idea why the wedge don't stick? Inside the house yesterday it did, outside today didn't, we had to use a clamp. Keiran arrived with empanadas today, white bag in the back.


At 12:30 (we started at 11) this was the try out saw.


Not bad for a first timer. The saw was previously filed all from one side, so there was a particularly annoying side

 this one:

There was some control lost at the gullets but the rhythm and sound was of a good filing.

Then some joinery.

 Planed flush

and gappy at one side. First dovetails of the man.


 That wood is olivillo, real green, light, beautiful planing. It was used in chile for flooring.

After lunch it was box time.


 another shot ad the dovetails


 Rauli wants to be treated with care, loves to split if you are too hard on him.


That was it. We got another sharpening junky in the world. If sharp tools are needed for a better world, well, we are one step closer. Cheers for that.


"So what did you do saturday?"

"I taught a kiwi how to sharpen japanese saws in santiago de chile while eating empanadas..."

Qué?

Wednesday, July 22, 2015

Japanese saw vice: finished and explained

It took me a while, mostly I didn't want to cut in half the rauli glue up since it looked like it wanted to be a table (despite the horrible grain orientation I made).

But yesterday night I cut everything to size and spent a good deal of time shaping the vice with a kanna. There are several points that became clear to me during the making and think they are worth noticing.

As we saw already, the 240mm size comes from the height at which the file stands when you are sitting.


The first section on the left of the drawing is 30mm. Then comes a gap of 90mm followed by another 30mm section that's slightly rounded. The holes come here. Then 90mm more and you reach the bottom. This last section is composed of two different surfaces: the one receiving the wedge and another one that is free. The wedge is made by making a line at 45mm of the bottom and half your thickness and taking that out with the plane. Once that's done, you need to reduce the part between the end of the wedge line and the holes so the only point of contact is where the holes are. This make for a nice clamping pressure.


I hope you see that where in the lines of the holes I didn't plane. So this is the gap you are looking for


The process of making is quite straightforward. Start with a large piece of glued up wood and cut to the lines with your azebiki:


Then cross cut with your biggest badassest sawest 


Applying some force to my new chumasaru pattern 360mm monster created this pattern. Eats rauli like crazy, almost like a circular saw. That's almos 10mm per pass, and reasonably straight so I could shoot it in a few passes. 

And then use the kanna to define the planes I talked about at the begging.


There I was making the wedge section, working both ways to go with the grain. 

That was yesterday. Today I chamfered the corners and sanded the curvature on top. It goes against my religion to sand but I want the metal fillings to stay away from the wood and near my tray, so I may also put some shellac on it. We will see. 


You need chamfers at either end of the jaws so you can put the saw easily with the jaws closed.


And this is how it looks after first sanding with 280, I put water to raise the grain and now I'm going for it again.


What else? The way I choose the grain orientation was really idiotic. You want to plane against the grain to make the shape, so ideally you have grain goin towards the centre of the vice so you can use the 鉋 from either side. 

I bought 5mm to large bolts, so I'm getting new. You also want it unmountable to plane the surface of the jaws the need may arise. 

Final thoughts in the design. Why the gentle curve on the vice outer face? To reduce weight. If you are gonna move that shit for 35 years of your life up and down, one side then the other, you want it the lightest possible. Why the wedge is so long? Because you can shape it to create a particular pattern of pressure, say press more on the left than in the right. This will help you to deal with wood movement (or at least I believe so). 

Now, just make the wedge, finish sanding and find my little shield. Then off to sharpening. Happy sawing, as Gabe says.