Friday, September 26, 2014

On globes

Things you learn after filing new teeth. 

Wear gloves. 

And I'd like to justify my laziness on not making a saw vice by saying that in japan they also do it like that. 

And they wear gloves.


Taken shamelessly from here

Thursday, September 25, 2014

Japanese shooting board


Now I can say my cheap shooting board is japanese.

Check it out here.

On the way to ChuMansuria

Explicit content ahead. Be warned.

I found the original ebay posting. The saw I'm changing the geometry of looked like this:

If you look closely, there is a saw behind the rust

note the missing teeth
So, whatever I do I cannot get worse, can it?

I followed my own advice and decided to file down the teeth, so I could introduce the new geometry.

This is the set up to lap the teeth.


I need to do better than that.

This is how they look.


I could almost stand on those flats.

Eventually, I levelled the whole thing, so there are no missing teeth anymore. And then, start filing.


I think my file could be way more horizontal. In fact, that's far too much slope, maybe this has to do with the final results. This is a really uncomfortable position for filing, but it works. It keeps me focused.

After several turns of the saw, filing one facet, then turn the saw, file the same facet on the other teeth, turn the saw, file the other facet, turn, file, turn, file, turn... I ended up with this.


Still a few passes to go, but the geometry is set.

Something I realised yesterday while filing was that, for the file to move downwards, you need to push into the teeth.

I kept on filing till there was no flat left, then I filled the top eye.  Then I looked at it, and yes. there was something wrong. I find the teeth too thick... not long enough, not a nice basal triangle. It cuts, that's for sure, but I don't want to put the set yet, I may re-file the teeth to get something sexier.

Now, Julia was trying to make pictures with the new camera and she shot a video. I have no idea how that is done but it was a nice mistake. You can peek how I file my saws.

Frankestsaw

So, she's finally back.

I still don't know if I should be happy or sad.


I got her from ebay seller outoofeurope. I think half of my salary goes to him.

The saw was the best surprise ever. Really thin steel, lovely signatures, and just an homogeneously thin layer of rust on top. Not bad at all for 15 euros included shipping.

But there was a bit of stress on the blade. If you look carefully, you can see a scar going towards the cross cut side. Roughly 90 degrees to the new scar. I think this was the previous owner, who had broke the saw and welded it back again. That's a good sign. If you go by all the trouble of fixing something, it means it is worth it.

It also missed the tip of the cross cut and that tooth at the end of the rip side.

Well, the thing is, I was ripping something while thinking about going to ecuador next year to get some shrimps, and suddenly: BAM.

I cried.

No, seriously. I really hope you never experience it, but breaking a saw like that is like killing by mistake a small guinea pig. You just feel guilty.  The doctor recommended whisky. 

She has been hanging there for a few months, until I decided to take it to the welder.

The boyfriend of Sara, an iranian girl from the office, is a goldsmith. He has plenty of funny (and expensive) tools for jewellery. He said, I can try it but I don't promise anything, ok? I said, go for it.

I forgot to say, once the saw broke, it didn't fit together anymore. Like if the crack had liberated some stress and the metal had just expanded. So I had to file it a bit to be able to put the two sides of the crack in the same plane.

We first tried to weld it without adding metal to it. That is, just melting both sides of the crack and hoping they remain together. While this gave a really nice and flat joint, it broke at the first try. So my friend suggested adding metal (stainless steel) in both sides. This for sure will hold but it can bent the saw and create more stress on her. I said, "got verdome, go for it". Worst case scenario the 215mm saw will become a 150mm small ryoba. He didn't have more time that day so I left the saw at his place. It came back today.

And there she is, half alive, half bent. I will take to the anvil tomorrow morning — Julia is working, so I can hammer — and will see if I can bring her back to life.

Wednesday, September 24, 2014

Doors

My dad studied architecture, and one of the books from him I remember from my childhood is "Detalles de la Arqutectura Española". I remember reading the title of the book, several times, but not opening it... the word details meant something solemn to me back then.

Until one day I opened it, and to my surprise, I didn't find a theory of architecture but sketches of balconies, windows and doors, amongst others. Hand made.

The drawings were beautiful, you could feel the heat of summer in the north of spain, the dryness of the earth, the infinite sun of 4:30pm in Zaragoza. All this in a few bricks, in four pieces of wood making the frame of a window. They were alive.

Or maybe, they were made through life. They were made because making is the being of the human, and what he makes perspires his own being. Spain is those details made by men who were born and raised with those details, from parents born there, and whose parents were born there.

The same you can find in the details of Bolivian fabric-making.

But I'm still in Graz, so that's what we look at now. Literally, a selection of around my block, the door of my building included. So, welcome to "Detalles de la Arquitectura Graziana"

Zu Hause


Around the corner


Those are doors from three different streets. I have the impression that the the doors on one street where made by the same workshop. The wood repeats, the motifs, the colours... I particularly like the Grazian Jugendstil, it's somehow a much more conservative Art Nouveau, as compared with Paris for example. The curves are not so tight, and always a general order must be kept. They have this cute naiveté of fascism. In a way, the political ideology of the two cities is condensed in its doors. From Wiki: "Adolf Hitler was given a warm welcome when he visited in 1938, the year Austria was annexed by Nazi Germany..." The doors haven't changed that much since the 40s btw.

The broken lion. For me, a remainder that in the last 50 years there has been no one who cared about fixing it or has the knowledge to do it. However beautiful these door are, their Zeit ist vorbei: Europe died with the Marshall Plan.

The basal triangle

This post is not related to any of my previous girlfriends.

I got a mail from one of our loyal readers making me notice two things. First, I confused rake and slope  and fleam in the previous post, now it's fixed.

Second, our attentive reader said something along the lines of, "ok mister physics. you think you are so smart no? Then why I cannot see in your model the little triangle on the base of the teeth that is so typical of Japanese saws? Regards, Mirijam."

What triangle? I replied. Then she sent me a picture.


I think she hacked my iCloud account, because that saw looks uncanny similar to my cross cut dozuki. And also this one.


Which again, looks like my Azebiki. I should stop using my mail address as the password for all my accounts. 

I think she meant the the triangle that one can see on the front of the teeth. (The back of the teeth is where you don't file. They looks completely flat from behind. This reminds me of someone... maybe an ex-gf?)

You can see that the basal triangle (anyone knows the japanese term for it?) is smaller on the cross cut dozuki, which also has finer teeth and cuts way nicer than the azebiki.

So, puzzled with this basal triangle and how it comes to being, I called a scientist. A real one, that is. Enters @elnicorivas

I was modelling the file as 2 planes, but when I wanted to model the cutting from 2 different sides, at 2 different rake, slope and fleam, I needed matrices. Not that I don't like them, but I failed Quatum Mechanics once because of them. But nico didn't. So he wrote the code to rotate the "file" in any angle you want to and I made the gif. 

Look mom, I made a gif without a cat on it. 


The yellow square is a piece of steel. Each snapshot shows the result of filing once on each side of the tooth. 

Yes indeed. That looks like a triangle.  

You still need to file to top eye, or third facet, but you catch my drift, don't ya?

Thanks a lot Mirijam for your insightful input, but it's really not cool steal other people's iCloud photos, don't do it again. Promise? 

When I did this, I realised something else...  you need to file at a constant position, the file only moves on the vertical direction, so to say, it only goes "down" when you file. I had trouble understanding how to do this, and the 3D model opened my eyes. Now I try it in the real world.

Thanks for rotating the planes nico!


Tuesday, September 23, 2014

Wooden File and sample cuts.

Done with my homework, boss.

Here is the wooden file:


You only need half of it. And we are interested on the profiles. So let's cut it.


On the right, a cut 90 degrees to the file's axis, on the left, 60 or so degrees, keeping the saw vertical. Respectively, they correspond to file with no slope, and 30 degrees slope, no fleam since the saw is vertical.  (For my definitions of rake, fleam and slope, go here)

Now, I keep the same angle with respect to the file axis, but I make a cut that is not vertical, that is, I add a bit of fleam:


Capicci? Now not only the angle is different, but the shape is also asymmetric. That's precisely what you are looking for when filling japanese teeth. That way, you don't touch the neighbour tooth when filing.

And now, an experiment not to be realised by kids in their homes. You need the supervision of an adult.

This is how it looks when you file with a japanese file and neither fleam nor slope.


The file loved it so much, that it decided to leave a few pieces on the steel.  The nicks on the middle of the are from this "experiment".  I have another one, don't worry, I'm still able to file.


Now, this is the money shot.


On the right, I filled only with fleam, but on the left... yes indeed, you guessed it, take a candy. On the left cut, I used a slope of around 30 degrees and 30 degrees fleam. Now the thing is working. The file eats the steel without any problem, it just flows and cuts. Beautiful. And you even can start to see a bevel on the scraper. (I just realised the fleam is on the other direction, sorry about that...)

I filed roughly the same number of times in the 3 cases. The last one (slope and fleam) went deeper because the file cuts way more on every stroke.

If you want more experiments filing metal with no fleam and no slope, you have to send me the file. I'm not wasting mines any more for the sake of research on that stupid configuration.

Unless you have any objections, I declare the case of the japanese slope to be closed. Now somebody should cook dinner — I'm getting hungry.

The Saw Club

The first rule of saw club is you don't blog about saw club.

The second rule of saw club is saws are either hanging or in use.

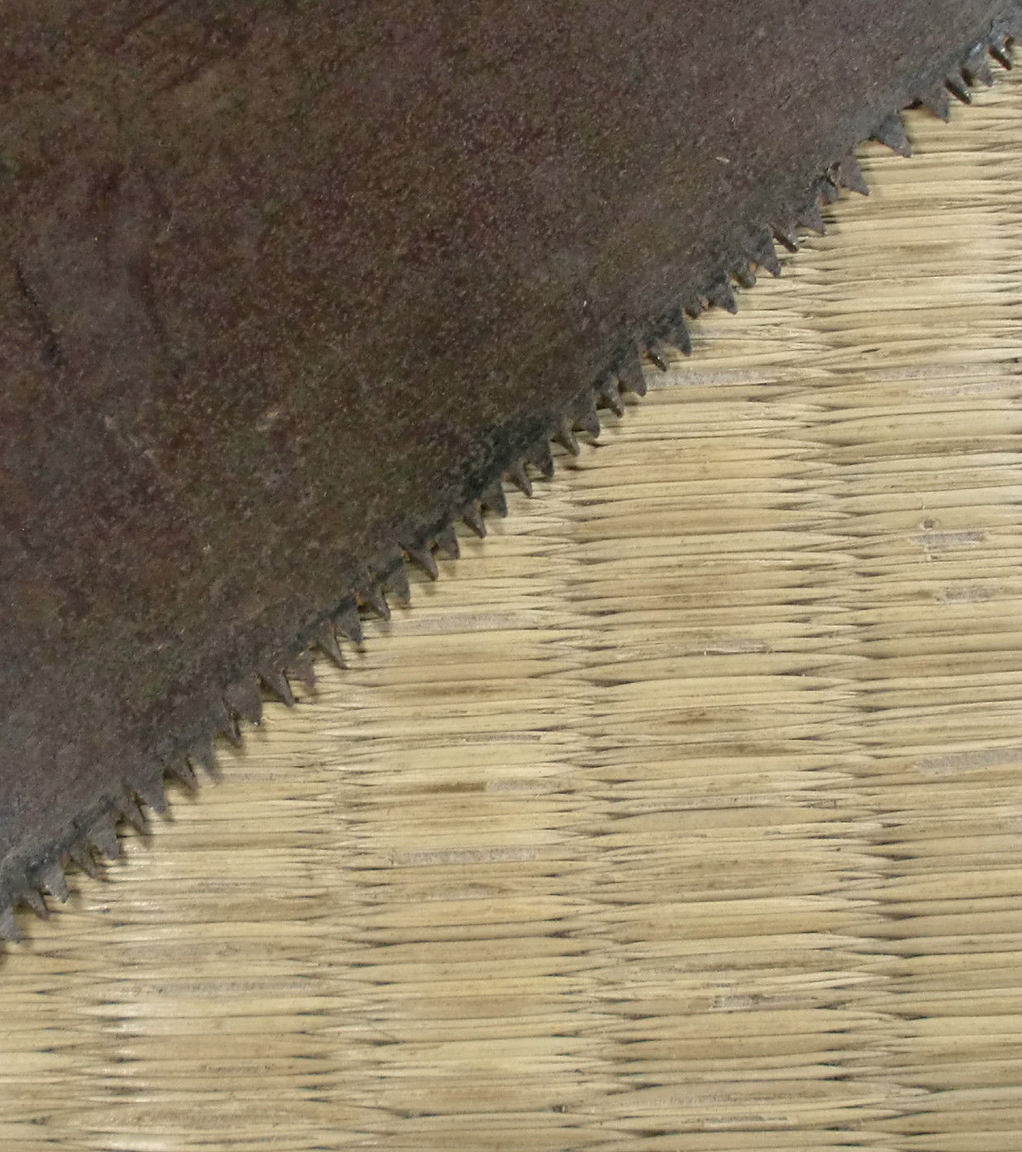
The third rule of saw club is japanese cross cut are filed with a large slope.

First two rules must be obvious, but the third seems not to be so widely acknowledged. (And here you will meet the part of my personality that Austrian seem to hate the most. If I see something wrong I will point to it and just say it, and show you with facts why you are wrong. Call it professional deformation, but I do think that right and wrong exists, and furthermore, there are pretty easy to differentiate.)
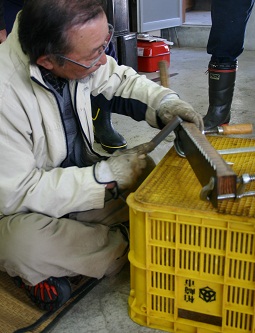
So, our good old Wilbur is doing it wrong:
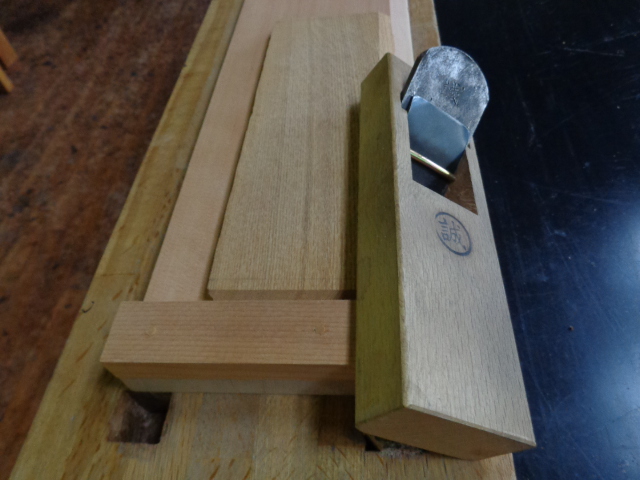
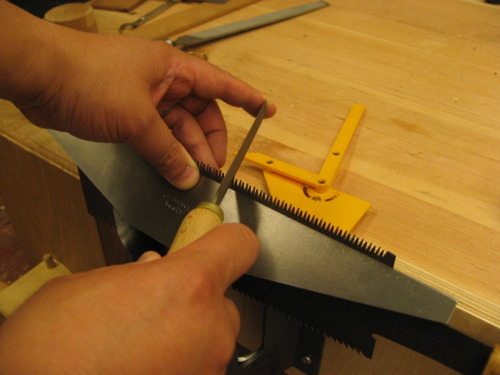


While this young man is doing it right:


Can you see the difference?

Let me tell you how I came to this realisation. I've been looking at getting a nice zaagklem from markplaats for some time now. But because of the weight I haven't been so convinced to pull the trigger.  Besides, having the saw vertical is not the most comfortable way to file for me, since like that the file is always pointing up... wait a minute, I said to myself, that's why this japan guys like so much to work sitting.  If you put the saw at an angle, then you can file straight (which seems to be easier — I would say that we are biologically wired to recognise the horizontal, and not, say, 17.45 degrees... at least it makes sense to me from an evolutionary point of view. Anyway, back to filing. )

So why haven't anyone talked about this? No idea.

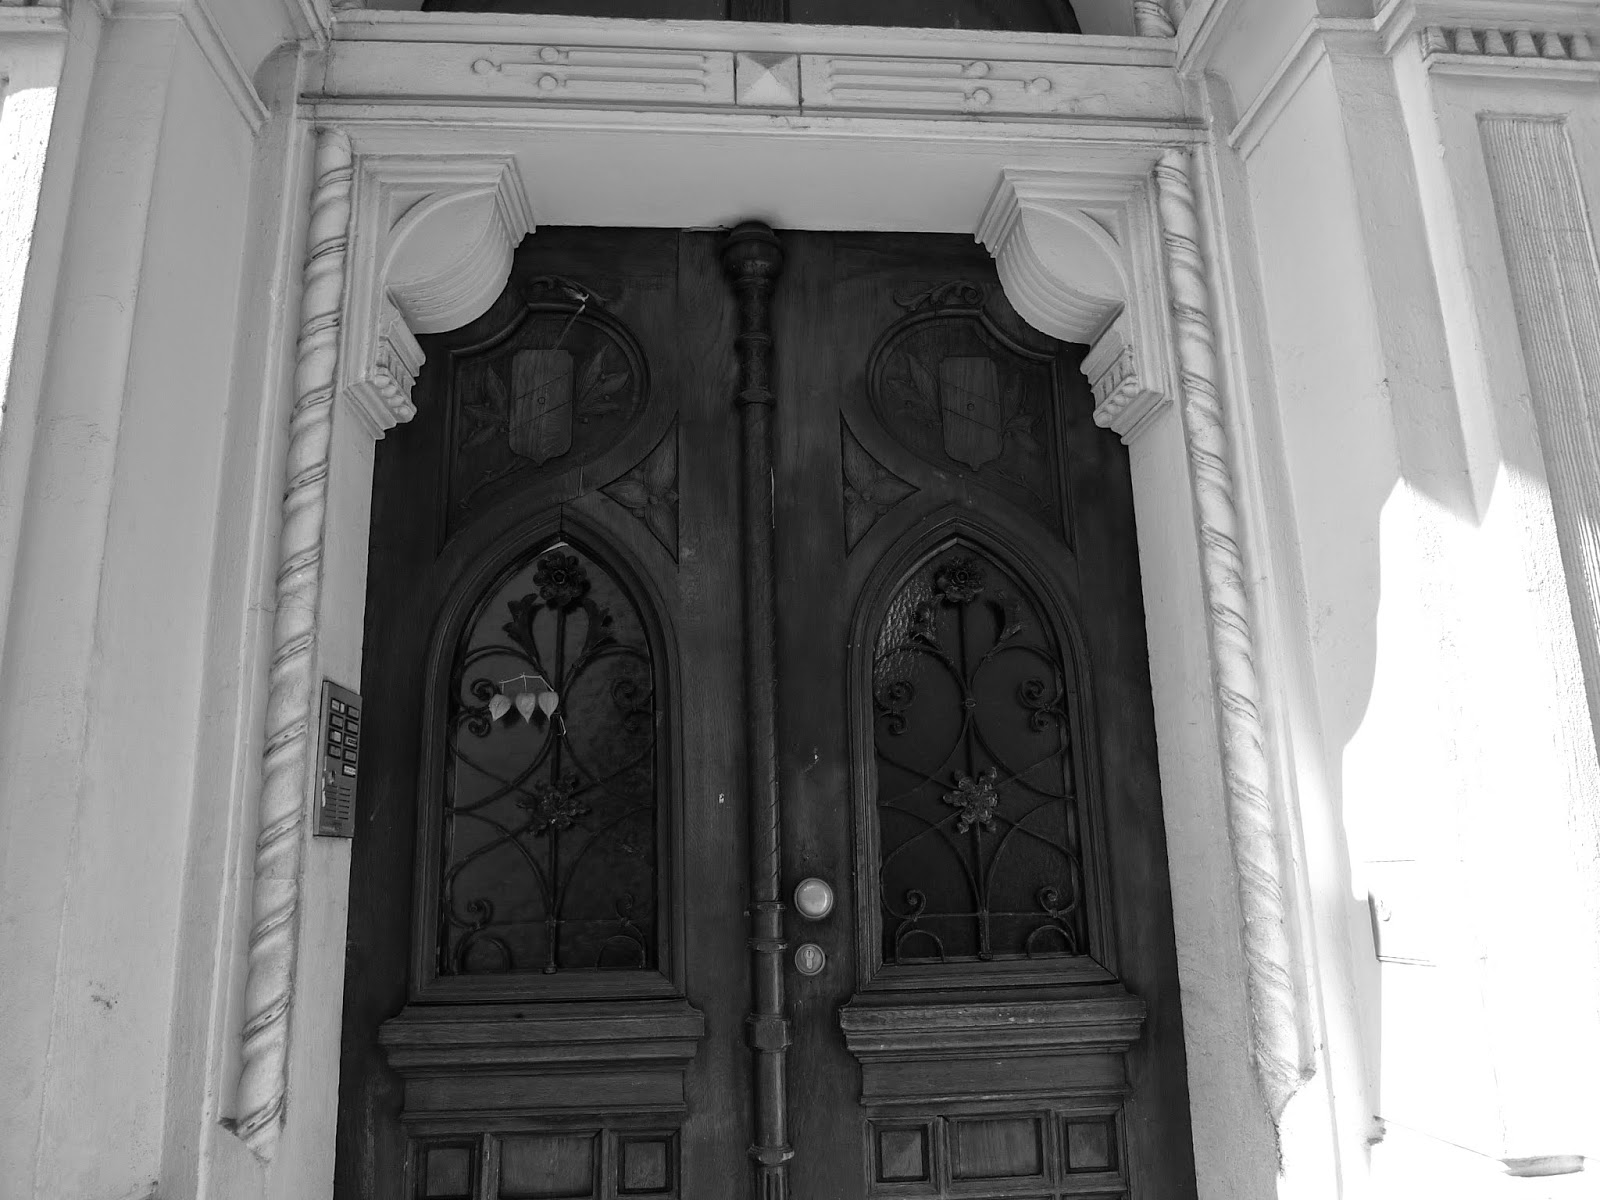
But the idea is not new, it even seem to have been normal here in the western world in the wood old times, good old times — pardon me, I have a problem pronouncing the "w":


Does it look familiar? Yes indeed, the guy from the drawing is half japanese. (Btw, go to the source and read the article, it's well worth it. And I am SOOO much scanning my saws, I hope nobody thinks I'm crazy here in the office.)

What's the problem with filing without slope then? You cut on the back of the teeth with the file. I have some steel from scrapers Julia bought to spread butter on the walls, or something like that, that I can use to show the different slope side by side (and they may be easier to scan also).

(Good news, I can save the money from the saw vice and buy more files. Actually, I think this make the gramercy vice useless for me, so I just saved 180 euros, that's plenty of files.)


Now for a bit of geometry. Hope you had good marks in trigonometry at the university otherwise skip to the end of the post and I tell you how to do it with hand tools.


Indeed, conic sections. It has everything to do with saw filling, I'm telling you.

If you intersect a plane with a cone, you will get different shapes depending on how the plane is oriented with respect to the axis of the cone (cf. wiki page on conic sections):


Well, your plane is the saw blade, and your solid is the file. And when you sharpen you intersect them, so depending on the angle at which you intersect them, you get different geometries. And cutting wood is all about the geometry of the steel, isn't it?

I'm not very good at 3D imagining, but I hope you catch the drift with the following pictures.

First, no fleam and no slope, like a rip tooth.


Here, the file is transparent yellow, so you can see the cut it makes on the steel plate. Blue paper steel, of course. 

Then we add a bit of fleam. We are moving the blade and not the file, and you see that the geometry changes, but it still looks like a western tooth. 

But now, we add also a slope, just like the old japanese guy from the video, inclining the saw blade. 

Now we are there. If you look close to the intersection of the saw and the file, the angle of it has changed, plus, the gullet is deeper.

Just repeat at a fixed interval and you get a saw.

I hope you are convinced now. The third rule of the saw club is japanese cross cut are filed with a large slope.

P.S. The hand tools way to do it is to plane a "wooden file" and cut it at different angles, this way you can see the effect of fleam and slope directly just by changing the plane at which you cut your "wooden file". I will do it as soon as I go home, sadly I ran out of saws and scrap wood at the office.

EDIT: I found the picture I was looking for. Here you can see clearly the large slope Nagakatsu-san uses

And I don't know hoe goed jou nederlands is, maar hier kan jij ook een lekker filmtje kieken in de keuken. https://www.youtube.com/watch?v=4j5B6C0m15E
Groets


Monday, September 22, 2014

Welcome to 2011

2011 is the year the brand new second hand camera we bought was made. An uber-improvement from the iPhone. 

Tomorrow comes the guy from the company that rents us the flat because we have a small leak on the bedroom. So Julia wanted me to clean the workbench. Besides, the cheap cloth hanger I made broke for the third time. 


Dry fit of the worst ever design for a cloth hanger. I made it the first time one year ago. It broke, I made another, and shortened this one so Julia had less space for clothes and thus less weight on it. It didn't work. Yesterday night it collapsed on the middle of the night. Sloppy cut joinery,  I really didn't know how to use a chisel a year ago.

With a friend we joked with making a journal of negative results. There you could publish all your scientific attempts that didn't make it. Like, this is NOT the way to do this. I guess this rack could go to the cover of that journal.

Anyway, back to saw sharpening.


Look Mom, I have japanese saws!

From left to right, crus cut, universal cut, flush cut, azebiki and ryoba on the processes of bein ChuMansu-ed:


Remember I told you first to file half of the teeth's height? This is why. When you attempt to put the positive angle, you first touch the top of the tooth, creating this funny looking pattern. As you can see from the picture the gullets' depth is not constant, but the angle kind of is and that's what I am focusing on right now.

(Now that I look at the picture I think it could be quite easy to write an image recognition software to check the alignment of the teeth, but where would the fun be then? )

Hopefully, tomorrow I will have back my other Ryoba from the welder and will be able to make some side by side comparisons. And in a few weeks time, the files I ordered from japan-tool should arrive, so I will be able to sharpen my big saws. So plenty of steel to make powder on the following weeks.

This weekend is Phil Edwards planmaker is in the country for the Magma vorfuertage, no idea what that means, but I really want to go. It is hell of a trip tho, since I have no car it will take me like 5 hours to make 240km. I bought the iron for a plane I made from Phil, the iron was bespoke to the plane and his really cool guy to deal with. This is the plane:

Gonzalez carriage maker plane with a Phil iron, photo by Katja

Go ahead and ask, are you starting to make carriages? Not really, I just like the shape of those little planes and wanted to see if I could make one.

Ok, final photo, I really hope this make clear how to teeth of my azebiki are filled. No fleam on either bevel, and the third facet, or top eye, as I will start calling it according to google translate,  is sloped on the same direction as the set of the tooth.


What's the point of it? I don't know but you can be sure I will try to find out. 

Sunday, September 21, 2014

Sleepy sunday

Still no news with new filling. Yesterday I cleaned, finished the spokeshave and tried, unsuccessfully, to glue the wooden glasses of a friend of mine.

I also gave the last touch to a cross cut saw I got from Opa. Seems to be a flush cut saw, since it's the most flexible saw I have.  It was laying around Opa's workshop for several years. It seems that some one, don't know who, decided to try to cut steel with it. Half of the teeth on the central part were gone. It was also bent like crazy. I think the guy tried to cut metal, the saw got stuck, then he hit it with a club or something to get it out.

As usual, I forgot to take a "before" picture. I'm always too eager to start working on something to stop to take a picture.

So this is the after:


I mean, now it looks like a saw, even with my crappy iPhone camera. (We found a second hand camera we like, maybe the guy answers today and we can pick it up this afternoon. Thumbs pressed, as german say.)

And this is how straight it looks. 


Not the best but certainly better than before. And it was free, so what would be better. A funny note, the blade doesn't have an uniform thickness along the length. It is like .2mm thicker near the handle, this is other of the reasons I think it's a flush cut saw, you only use the middle section of the blade, so it wears more.  I haven't put set on the teeth, so it's not really useful for cutting long pieces, it jams. I need to glue some dowels in a board and try if it is actually a flush cutting saw.

Btw, the 75 mm  file I have is a tad too large for the job. This is a 19 TPI saw, and it gets really difficult to not to touch the adjacent tooth. I want this one:

It has a cross section of 5.5 x 1.9 mm, almost 30% smaller than the one I have.  

Btw, did I say that I killed an edge of my file? I read it at Giantcypres that the guy has a safe edge on his file. Mine didn't have so I put it on the diamond stones for 3 minutes and went to file the top eye (third facet). It really works nicely.   

And here it is the finished spokeshave. I gave up with the shellac and went for wax finish. I use this boy  

I discovered when I was climbing a lot in Enschede and my hands were totally fucked up. It does wonders, and if you put it on your tools, your tools kinda take care of your skin when you use them. Win-win situation

The top side:

Boxed sole:

And bottom.


Thanks to Opa for letting me steal the maple and boxwood from the scrap pile. The blade comes, if I remember well, from a Dai-naoshi Kanna I got from ebay seller Yusui. The body cracked and had a bolt. I don't like bolts so I made a new dai, slightly different shape. The blade takes a really nice edge. 

And why sleepy sunday? I woke up at 9am – the only time you have direct light on our living room to take the pictures – and then back to bed till 1pm, it felt like in the good old times.