Today (now yesterday) we (Julia and I) went to costumes to pick up two packages, a plane (more on that tomorrow), a hammer and two knives. Today is the knives day as the title says.
Why Japanese knives? Cause you already got the sharpening stones so why not use them for making your breakfast better?
So, let's go to it. This is what you get in Japan for 1000 yen (10usd). I forgot to take a picture before touching the edge of the lower knife, it looked rusty but went away in 3 minutes or so.

They look crap, don't they? That's why they go cheap. Japanese don't like rust. I love rust. Rust hides beauty sometimes.

This, you may not believe it, seems to be a stainless steel knife.
The lower one is a laminated one. The weight difference is amazing, the carbon steel is like 30% lighter. Note the different angle of the bevel at the very heel. It's dirtier, that is has a greater angle, that will correspond to the back bevel on the mirror side as we see next.

Very rusty and the signature long gone. But a beautiful lamination line.

And evidence of back bevels on the heel. According to some wise man of Hawaii that's to cut bones. It makes sense to have a stronger (larger angle) heel, thus back bevel.

This is one characteristic I was looking for:

You know Bob Kramer? http://www.amazon.com/Kramer-Carbon-Steel-Chefs-Knife/dp/B005KJC7FM here are his "cheap" knives. I was reading a piece about him and they talked about the rounding of the knife at the heel, something you need to make by hand so make the knives expensive. When you put your index finger there in the knife a sharp edge will be really annoying. Try it with your knives, you will understand what I mean. This knife came with that chamfer there, I just cleaned it a bit with a file. Since that's the soft iron it's really fast to make and makes the knife incredibly more comfortable.
Sorry for the digression. Here the backs, lower had a bit of 1000 stone.

Now stainless also got 5 minutes of 1000 stone. Starting to look nicer, isn't' it?

The back had more surprises:

Cheap machine made ura. After that I used a 1200 piece of sandpaper to clean the dirt on the knife and looks pretty but feels like a rough knife, not a delicate piece.
I managed to leave the stainless steel razor sharp, but I'm not sure still if I like it. It's heavy, but has a really nice curve to it to chop garlic.
You may have not noticed, but the carbon steel one has the wrong curvature at the tip. Look back at the first picture and you will notice that the bevel is wider on the tip. This makes the curve flatter and it does not rocks so well as the ss one. That was poor sharpening from the previous owner and I will need some work on it to grind all that off, may be like 2mm or so. On the other hand, it means that it was sharpened plenty of times (and the ura was well kept) so speaks of a good knife. That and the big chips talk of good steel. It feels awesome on the stones too.
Now for some joinery.
I got the wood for project mayhem joint yesterday. In the afternoon I decided to start making the joint when Gabe posted a comment saying he wanted a video of the layout. Not a bad idea in fact.
This is the joint in case you don't remember:
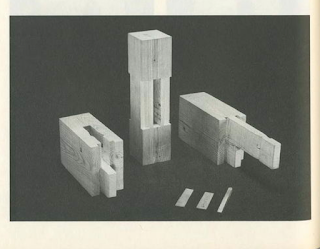
Before bringing the camera I decided to make a rehearsal of the joint to see what I was supposed to draw. This is what I came up with, made a few mistakes but it was very useful to understand how to put the "sashigane" around the centre line. It's not a difficult joint to mark in fact.

The tick line marks where I need to cut each of the 3 pieces.
This is the column, that I made the mistake of marking from the sides first, when in fact you need to mark always from the centre line.


and another angle of the make part.

Later in the night I remembered I got a line with one of my planes, Julia had already put it in the luggage. The line is green btw.

Anyway, here's the video. Sorry the bad timing of the images but first time I do this and don't want to spend another hour editing the video so that will do. Next one is hopefully better.
And a teaser for next post:

Haha......well, it's not that I had an original idea or anything (my original thoughts are generally of the notably bad sort).....
ReplyDeleteA great thread on the single bevel knife sharpening...
http://www.knifeforums.com/forums/printpost.php?tid/848615/
Also, the rounding or the heel is for all different fingers, not just the pointy one. Try the "crab claw" grip, for those who havent worked in a kitchen professionally. A technique for bigger blades, and a mainstay of the kitchen.
I need to get to the public library, watch all these videos you guys are putting out!
Whoops!
DeleteHere's the correct link, halfway down is an illustration that shows the "clamshell" at the heel of the blade.
http://www.knifeforums.com/forums/printpost.php?tid/830329/