Anyway, today I received my part of the saw shipment Murakami sent me when I just arrived here. My plan was to send a saw for Steve to repair and play with (one big cross cut with 3 teeth missing, sharpened by me save those 3 teeth), but shipping from Chile was a bit of a pain in the ass. So I just picked up a nice looking lot from Japan, and asked Murakami to ship it in two pieces, one direction NY and the other SCL.
They were big saws (when you start sharpening, the bigger the better) and a nice dozuki I wanted. I have 2, but one has many many teeth missing (it was the first I got) and the other is a bit flimsy, so I keep on looking for new options. One plan was to get a few disposable z-saw or the like in germany. Opa uses the 180mm and I like it a lot for small stuff.
But today they arrived.
Several things must be noted. The handle is not symmetric top and bottom, is more hear shaped than oval, this is most obvious in the large cross cut. The metate who sharpened is awesome. Chumasaru pattern exists in the wild. And somehow I developed an excellent eye to find nice saws from crappy pictures, however, I don't have any sense of scale.
First, dozuki with nice sen marks and tensioning on the blade. This is the first time I see a dozuki tensioned, and man I do love it. Jason, please hurry up finishing the book, I need to start tensioning my saws.


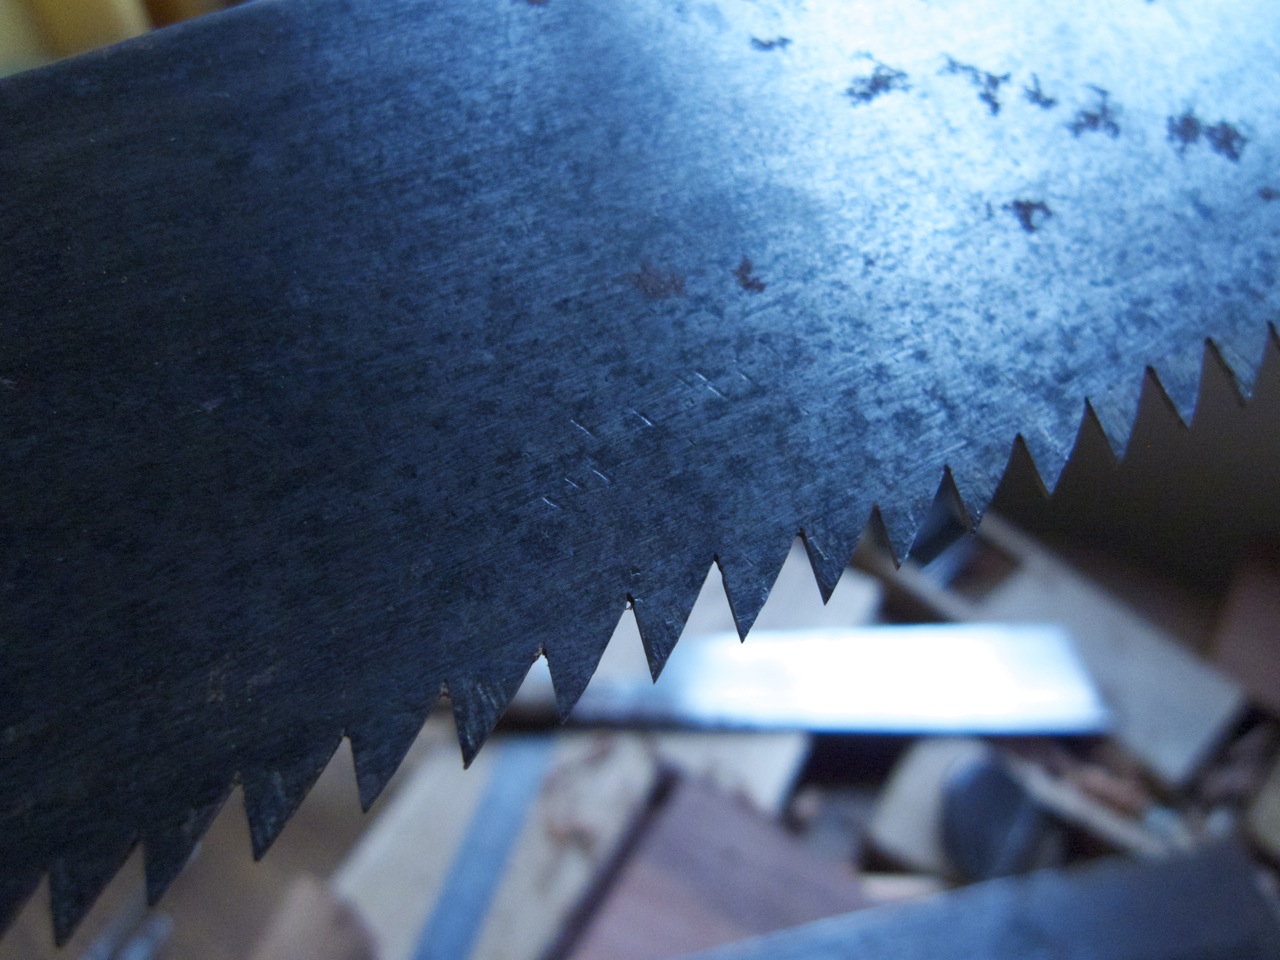
Then, the beast. 360mm of cross cutting power and hammered flat with love and passion. Check that taper

Those teeth. They look almost flat, really really low angle and cuts beautifully. Also note the chumasaru rake

This is the egg shaped cross section,

and the set. Very minimal, lots of taper on from edge to back though

And the ripping saw. The hammer marks are quite in your face. No attempt to hide anything
The welded tank. Seems like thinnest you can get to a finished thickness just by hammer the better blacksmith you are. I like to saws where the forge skin is still present somehow in the tang.

Very hard steel? Tamahagane? Not all the teeth are set like this, just a few places.


The other side of that same place

And plenty of triangular marks in both directions. Very intentional marks, like trying to entangle the tension zones in the saw, if that makes any sense.


And all together, there. The dozuki is a norma 240mm saw, the cross cut a totally 2-handed saw. I don't know if I like the egg shaped handle though.

In the left you can see the wood for project mayhem, I need to finish soon. But I've been sick so I just plane the wood for the vice in my room, looks something like this now:

Roughly 1in thick, and 30x65 cm or so. This is the largest glue up I've made... a friend of mine wants me to build him a bookshelf so I'm gluing up rauli, this is the tryout to see how much time it takes me. Far too much at the moment, and I should pay more attention to the grain, this looks too discontinuous with the cathedral on the edge.
Clean the big saw, and start cutting the mortice.
I love the saws, thanks for showing them! The setting marks on the rip kataba, have you ever seen that before? I've only seen marks parallel to the length of the saw. Is the steel good and hard? It looks like a real worker. Now I have to give a wedge shaped cross peen hammer a try.
ReplyDeleteCool little blue metal lathe, by the way.
it's a green toyo in fact (the camera settings, I tell you), I smuggled it to chile a few years back from NL. Very precise lathe, made by a japanese company that fabricated cameras. First time I see those marks for setting. I haven't tried it yet but looks really well set up. All the rough marks end up having a very good balance and the saw just feels awesome to hold. Btw, do you put a wedge on the handle to secure it? I may touch it up tomorrow and check how the steel files. We have a log laying in the garden from an old pine, maybe cedar, that dried long ago. I was thinking give it a try and rip that thing, I guess a few days work.
ReplyDeleteI don't know how the handles that you see (as on your rip kataba) diagonal to the tang are held in place. When I made mine I tried to just cut a slot that the tang wedged into and it worked loose through end grain compression very quickly. I ended up using two small metal pins through the handle and the tang. Wedging might be the way to go if you can keep the wedge from rubbing your hand in use. Good question...
ReplyDeleteIf you rip your log what will you use the timber for? That saw looks like it would be great for cutting thin quarter sawn boards, something I've wanted to try for a while now.
Today I was ripping a bit of the log to check the saw. It needed sharpening. The wood is nice, vey yellow and old, tight grain. Maybe boxes and use it the saw to cut quartern sawn as you say.
ReplyDeleteThe handle just stayed put btw, it's cut in such a way that it locks itself when you pull, a la holdfast. Very interesting method. And it's a pleasure to use it with two hands. But if I put too much pressure, it drifts to the left on the back side (the one I don't see).
It's a really good work out, and balance exercise.