First, my favourite american in Hawaii gave us a lesson on how to make things flat:
http://mypeculiarnature.blogspot.nl/2015/05/japanese-saw-tuneup-straighten-out.html
Then, another american appeared who has a few very sexy whale blades and is turning everything into planks
http://granitemountainwoodcraft.com/2015/06/02/just-cant-stop-sawing/
I've been busy cleaning the trees so some sun can reach the house and I haven't had much time for tools. However, today was feeling ill so decided to take it easy and work a bit with the computer.

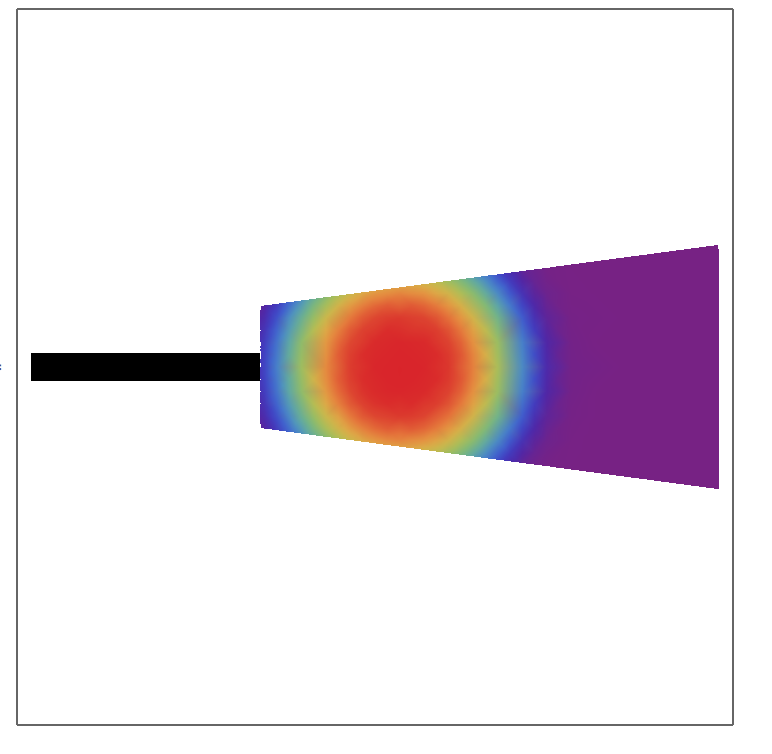
That's the representation of a not so straight saw. The blue is bent to one side and the red to the other. Green is level.
I took inspiration from this saw:

What I'm trying to illustrate is the displacement field of the saw. If you wish, how far it has moved form its ideal flat straight state.
Now, some saws will have one "oil puddle"
This are the ones you need to work in a circular manner (isn't it Jason?) so you expand the ripples around till you get something "flatter"

And eventually much flat

Note that in the different drawing the colour scale is not the same, the amplitude of the waves gets smaller as you have more ripples. (Sorry for that, I was lazy today too so didn't want to code that, perhaps I update it later.)
Now, when I was looking at the saw today I was mentally superimposing this colour map on the surface of the saw, a bit like Jason's pictures but with LSD colours.

Yeah, I know, reality is not as circular and nice as computer models. But that's the fun of it, isn't it?
So you hammer, change the colours, turn up and down the saw, and keep in your mind updating the colours as you hammer. Check with the saw that the image you have in your mind corresponds to reality by looking at how straight the saw is.
All this is a bit like trying to teach how to play violin by writing, so don't blame us because our explanations are poor.
After 10 minutes or so the saw was 90% straight.
I sanded the surface and then more hammering. (I had to fix a shitty stanley pein and ball hammer in the meantime.) Then I stopped.
"Know when to stop" says Mark.
I upload the picture of the straight saw once the battery of the camera is full.
Done. Camera is full and I had my tea and bread with cheese.
Now, there are just a few spots on the saw.

And this is how it looks from one side


There's still a kink on one side near the handle but I don't think I will be spending files on this saws, so it doesn't matter.
Just for the sake of coolness, a before and after picture:

Ok, and since I had more time think about the problem, what follows is the evolution of the "saw" when you invert each of the 3 kinks it has. (Some kinks are pointing in one direction and some in others, and what I do with the code is simply to invert the sign of it). To make it more "realistic" I superimposed a wave as in the first image, that is a saw that has both kinks and it's bowed.
You start with this:


As you see, it's not so easy. Thanks god you don't need to compute the eigenvalue decomposition of the problem, but simply hammer it straight.
Continuing with the analogy of the violin, you know where to hammer to produce a sound, and you just do it. It's only a saw. You are only You.
I had to read this twice to be sure, but The second to the last image is frighteningly close to what I have been visualizing when I am doing this work......great!
ReplyDeleteAnd also.......your final statement, another of Mark's mantras, "The saw is just a saw, you are only you.". Such a little thing, but a little something that keeps us from true understanding. Don't worship the tools. Don't be too afraid of failure. Learn how this stuff works. It's only a saw. You are only you.
My new Koan.
Thank you.
Good to hear we are talking the same thing, I was afraid I was crapping outside the bin.
DeleteNow I have a new task. Start from virtual flat saw and hammer it with random kinks and bows. Make a video of it, and then play it backwards. If it doesn't help to understand at least will certainly look cool. (That's what you meant with the temporal representation of the process no?)
And yes, such a simple thing, but utterly necessary.
When I first started doing this with Robert Meadow, following his lead, I made a straightedge from a 150 mm file (cutting off the tang, grinding and honing an edge and mounting the other edge in a grooved wood shoe. (for comfort and ease)
ReplyDeleteStarting at the neck, comparing sides, checking diagonally, crosswise and lengthwise, it's a good way to begin to see.
(Hope I'm not repeating myself here, but old folks sometimes do)
Looking at the colour maps, the places that attract my hammer is where the colours are changing from one to another, not the pure primary colours. In terms of high to low point mapping these are kind of neutral, but in terms of "hizumi", they are a locus of dispersed kind of massaging pressure, which in some cases eases compressed (too much steel in to little space) areas. To do so, steel has to move to a place where there is at least room for it - which is not knowable by me anyway, till I've worked on it awhile. If you hit the pure colour spots or bands you may create more compression. If there is no other alternative, a shallow peen face 6 oz. hammer on a hardwood anvil is used on compression (both sides) to make dis-continuous mini-waves. Takes far less energy than it sounds like!
Hopefully the highpoint on the actual blade is just high, and not compressed. Since you are getting good results, it must be compression free!
The color maps of the ryoba form do indicate compression, as the series progresses. In a non-symbolic saw, these make a poka-poka sound as they flex in and out, as you bend the saw back and forth. Also, they may be subtle enough that you can't hear or even see them, and they come in all kinds of shapes. But they can be seen under the right conditions.
Bravo!
Ha! Mark! Perfect timing!
DeleteI was just reading some of your older written work...wonderful stuff that I needed to be ready to understand. So ironic that my current understanding of this subject keeps falling into the analogy of massage, but that is exactly how I relate to this subtle topic. Sound as well, is a wonderful assistance.
I just found my first "Hawaiian" Japanese tool....a 210 kataba, rust as hell but salvagable, stamped "made in occupied japan", "Honolulu", and the "Z" symbol just like today's Z-saws! ...the wrong type of handle as well. I will be posting in the next few days. I only hope that I can do it justice. So much fun!
http://www.daikudojo.org/Archive/2001_mark-grable-handsaw-exercises.pdf
DeleteThank you, Mark!
DeleteDid you turn your Ryoba into a Madonoko?? That is really wonderful.
ReplyDelete